- Pedro
Ok, we now have a general idea of what we want to do, so let's start the basic track plan. I always with a string diagram. The string or main line is the best place to start because it helps you sketch out all the key features of your layout in an orderly fashion.
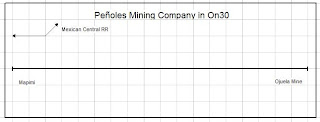
 To begin, we draw a horizontal line. This thick line represents the main line of the railroad. The railroad goes from the mine (supplier) to the town (consumer). Notice that we have terminated (small line on the end of the main line) to show that the railroad does not go past these boundaries or interchange with another railroad. This is where we put the names of the two towns on to the diagram as well as the name of the railroad. I make these diagrams using a computer aided design (CAD) system called 3rd Plan It. While its not the best thing in the world, it seems to be better than the other options. This particular file is called Peñoles Mining Company in On30 String Diagram 1.01. Each time I make a few additions or corrections I save the file again and change the last number to the next digit, a "2" in this case. If I make major changes such as adding a whole new town then I'll start a new series of drawings using the code 2.01. I can't stress enough backing up your changes this way as it makes it easier to go back and start again when you have to. Organization is everything!
 From the history document we know that the smelter does ship materials on the Mexican Central Railway. That means the smelter probably shipped silver to market by way of this standard gauge line. So we'll put in the railroad on our diagram. Since it comes and goes to destinations off the layout, we'll add arrow heads to the line.
 The smelter is just outside of town and will need at least one siding in order to unload silver ore. We'll also note that the siding in for the smelter and put it between the siding and the Mexican Central to indicate that materials are going in and finished goods are going out of the smelter.
 Likewise, the mine will probably have at least one siding as well. The ore cars will probably be loaded at a tipple, so we'll put in the tipple track.
 While we don't have the actual track plan for this railroad, we can infer some trackage just because of our knowledge of railroads. In most every town and mine you have a passing siding so that the locomotive can get on to the other side of the freight car to move it. Knowing this, we'll put passing sidings in on both ends of the railroad.
 I like to know where I'm going, so up in the corner I put a navigation symbol that let's me know the railroad goes east to west.
 Steam locomotives needs lots of "tender" loving care, so we'll need a place to shop them. Thus, we'll add at least one service track in Mapimi. I also start dressing up the sketch. The town names are disappearing into the drawing, so I make them bold and increase the type size so they stand out.
 This gives us a completed sketch of the railroad. While this looks nothing like the layout design that you are expecting, this critical step makes sure we know WHAT has to be on the railroad. We aren't done, however. This is just getting us started.
Um, excuse me Senior Pedro...but you goofed up! Its a good thing you have this in a CAD program. You called the tipple in Ojuela a smelter!!! I change it for you! See? Si?
 Aye! Carumba! The name of the railroad, she no print out right! El crapola! I go fix...
 Sometimes things just don't work right in 3rd Plan It. Often I get frustrated and go back to paper and pencil.


No comments:
Post a Comment